

In project management and business reporting, the use of traffic lights, specifically the Red, Amber, and Green (RAG) system, is an internationally recognized method to convey status, importance or urgency. These simple yet powerful indicators provide an immediate sense of where a task or project stands. A green light often signifies that everything is on track, amber indicates caution or slight deviations, and red suggests issues or challenges. The intuitive nature of this system allows stakeholders, even those without in-depth project knowledge, to quickly grasp the state of affairs.
In this guide, we'll walk you through setting up a RAG status field driven by the built-in task status field in Microsoft Project. This method is less subjective and quicker than manually setting RAG status for each task on your plan.. You can also download a PowerPoint slide deck detailing each step, and a Microsoft Project plan with the custom RAG field already in place, so you can integrate it into your own projects.
Table of contents
Video - How to create traffic light status
Step-by-Step Guide:
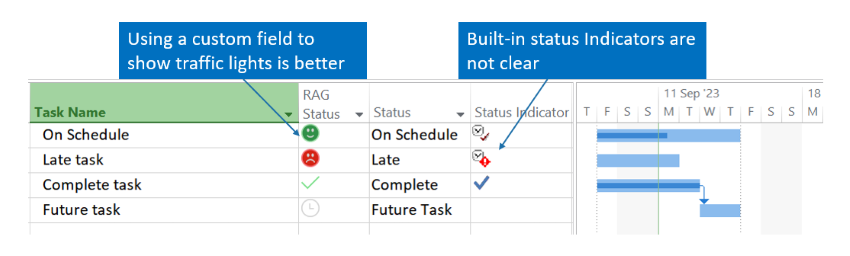
1. Introduction to Status Field:
- Microsoft Project's built-in status field offers labels such as 'On Schedule,' 'Late,' 'Complete,' and 'Future Task.'
- Although it comes with its own indicators, these are not very clear.
- In this tutorial we will create more intuitive, traffic light-based indicators.
2. Access Custom Fields:
- Right-click within your Microsoft Project window.
- Select 'Custom Fields.'
3. Rename the Custom Field:
- Select a task custom field.
- Rename the field as required. For example something like RAG status.
4. Setting Custom Attributes:
- Set the custom attributes to 'Formula.'
- A message will pop up warning you that any data in this column will be deleted. Confirm this.
- In the formula field open the Field menu and select 'Status' to insert it into the formula field.
- Click OK to close the formula box.

5. Configure Graphical Indicators:
- Under the 'Values to Display' section, choose 'Graphical Indicators.'
- Your tests will all be 'equals' followed by the value that maps to the status indicator in Microsoft Project:
- 0 maps to 'Completed': Choose a gray circle.
- 1 maps to 'On Schedule': Choose a green circle.
- 2 maps to 'Late': Choose a red circle.
- 3 maps to 'Future Tasks': Choose a clock icon or any other preferred indicator.
- Click OK to close the Graphical Indicator box.

6. Adding the Custom Field to Your View:
- To display your new field in the current view, right-click on the column headers.
- Choose 'Insert Column' and start typing the name of your custom field. Your new RAG status should appear.
Download a PowerPoint presentation showing a step by step guide to create this custom field
Download a PPTX guide to setting up this RAG status .pptx
Download a PPT guide to setting up this RAG status .ppt
Download a PDF guide to setting up this RAG status .pdf
Download a Microsoft Project Plan with the custom field already set-up
Download RAG-status-custom-field-behind-on-schedule.mpp
Microsoft Project can feel daunting to learn, but you only need to know the essentials to be amazingly effective! Get up to speed in less than a day with my book Essential Microsoft Project.
Written by the founder of stakeholdermap.com
- Concise, focused guide that cuts through the clutter
- Step-by-step instructions for creating a project plan in under a day
- Master essential skills like work breakdowns and task sequencing
- Real-world troubleshooting for 20 common scheduling challenges
- Rapidly get up to speed if you're new to Microsoft Project
- Includes glossary, support resources, and sample plans
